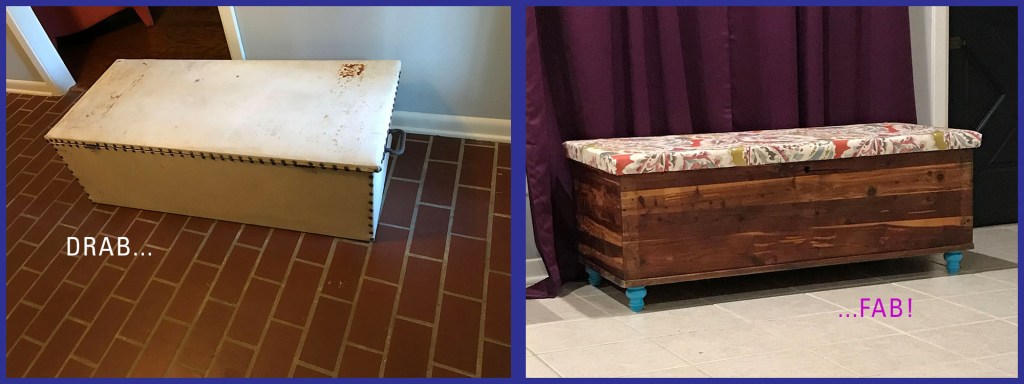
My remodel and DIY projects are hit or miss at best. I almost always have fun with them, but they aren’t always successful. A while ago (read, about three years) I bought this awesome trunk at an estate sale next door for $12.50. I figured I could wipe it down and use it as is and was super excited to get it home. I borrowed a dolly and dollied it across the yard and parked it in the entry way (if you haven’t visited me, my house is huge and I have tons of space I don’t visit regularly…out of sight, out of mind and all) where it lived for about six months.

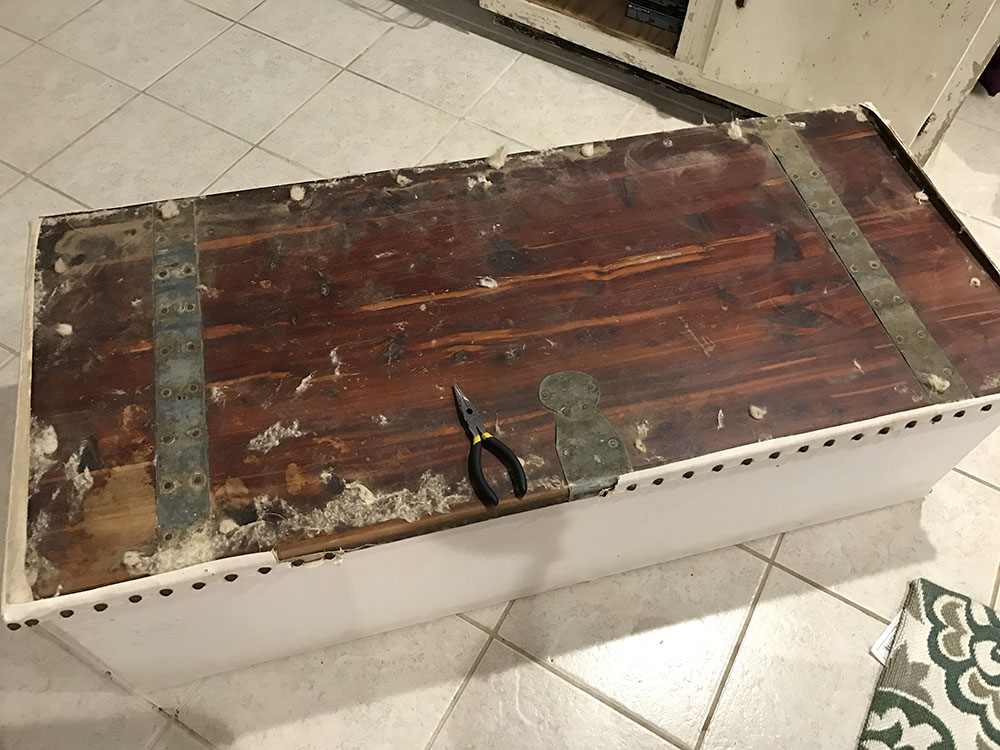
I finally decided to work on it and opened it up to find this – interesting, that looks like cedar! Explains the lack of bugs.

I got a wet rag and soap to clean it up and…nothing. This grime was not budging. And it didn’t budge through soap, alcohol (on it, not me drinking), ZEP (I didn’t think ANYTHING could resist ZEP!), acetone and I don’t know what all else. It was filthy and was determined to stay that way. I regrouped and decided to just take the leather off and see what was underneath.

Holy moly! This thing was beautiful under that gross faux leather! I spent days trying to pull all the upholstery tacks out and finally after three bloody hands got mad and put it out in the sunroom…where it stayed until I got tired of looking at it moved it to the storage room where it stayed for about a year. About six months ago I decided to revisit this project (again) and drug it all out. I finally got all the tacks out of the trunk itself and decided to hold off on the lid.
The next step was to get the thick varnish off so I could try to remove the scratches, glue and gunk. I grabbed my hand-dandy hand sander and some fine grit paper and went after it. And promptly received a resounding NOPE from the varnish. I changed out to a course grit paper and only managed to ruin about three pieces with no discernible difference to the varnish. UGH!
Back to the store to buy some varnish remover. Which did absolutely nothing at all to whatever kind of space age, apocalyptic-proof super varnish these people used. This resulted in me once again angry and the trunk back in the shed for about six months (do you see a trend here yet???).
About a month ago, I decided I was once again going to be brave – and I had apparently forgotten all the pain, sweat and literal blood I had already put into this this – and try once again to refinish this trunk.
I did lots of research and found this amazing elixir from above that will eat through anything. Like…anything, so be careful. It has apparently been bought out by Minwax, so I don’t know if it works exactly the same, but I hope so because this stuff was amazing!

I used a little plastic container I could trash afterward, about 50 latex gloves, wire wool and several strips of cut up t-shirt. The varnish on this trunk was so thick and gooey that I could only clean small sections at a time. I started out dipping my wool in the furniture refinisher and gently rubbing it in a circle about the size of a salad plate until the varnish started coming up. I would then wipe it clean with the strips of t-shirt. I never tried a cloth that had any nap, or fuzzies on it, but I’m fairly certain that would have been a disaster. The t-shirt fabric doesn’t pill or leave behind fuzzies and since it was a repurpose anyway, I did not mind just throwing them away when I was done. I kept repeating this process until I had one whole side done. I would then let the trunk totally dry for about 30 minutes to an hour. After the trunk had dried, I would repeat the process again with fresh furniture refinisher, gloves, wire wool and fabric strips. I kept up this process until each side was completely clean and smooth to the touch. This process took me about a week to get all four sides of the trunk totally clean since I can only work on it after work in the evenings.
I got it all wiped down and then sprayed a little of this orange furniture polish on the trunk and Oh. My. Beautiful!

Now to tackle the top. Unfortunately the lid had much more damage than the actual trunk itself and I decided that instead of spending hours trying to salvage what was almost guaranteed to be a loss, I would just cover the top. I found this beautiful upholstery fabric at Hobby Lobby and I got a roll of 2” padding.
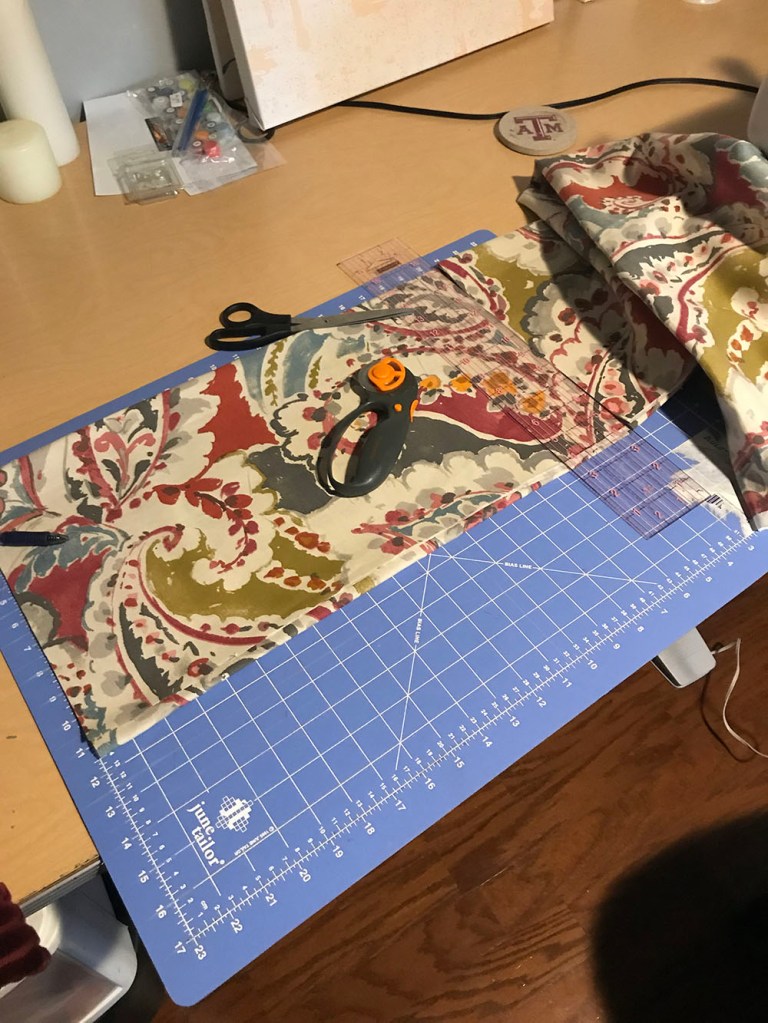
To cover the lid, I first trimmed my padding to fit the top with an X-Acto knife. Once trimmed, I laid the padding on the fabric with the printed side down about three and a half inches away from the fabric edge. That would give me enough space to pull the fabric around the padding and up to the trunk lid, as well as enough to fold under about a quarter to half an inch so I didn’t have to stitch the edge to ensure my fabric didn’t ravel. I took my handy staple gun and placed staples all down one long side of the lid. I then moved to the other long side. I made sure I pulled the fabric snug, but not tight because I wanted to make sure I still had sharp, crisp edges on my padding. If I had pulled the fabric taunt it would have rounded out the padding edges. After finishing both long sides, I carefully turned the corners and stapled the short ends as well.

I bought some new hinges for the lid and decided to put some feet on it to give a little more height. I got these unfinished furniture feet online from Amazon for about $18 for the set of four and I painted them turquoise to give a pop of color. I started out by attaching the feet with wood screws and then made sure to add floor protectors of the bottom. I reattached the lid with the new hinges and my trunk remake is finished!
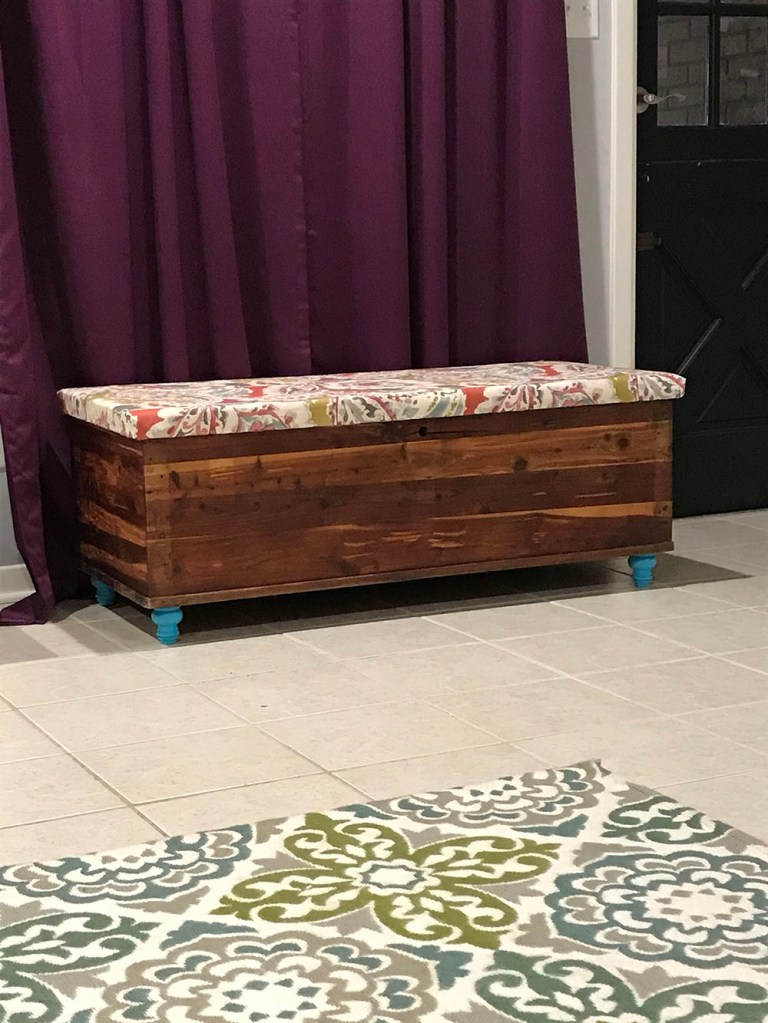
It only took 3 years and the fabric, padding and feet cost about five times what the trunk cost, but I still got this gorgeous trunk finished for less than $75! AND I was able to repurpose something that would have likely been trashed otherwise.
I also used the extra fabric I had to made throw pillow covers to tie everything together!

I do so love a DIY project finished and looking cute!
Love, Misty

Leave a comment